Connecting Excel
Access your QuickBooks data with all the power of Excel at your fingertips
Before you start
- Excel for Windows. Power Query's ODBC connector is a Windows feature.
- A password for the company you want to query, from Settings → Database Access. See the overview if you have not generated one.
- Permission to install a driver on your machine. The installer asks for administrator rights.
Step by step
-
Install the PostgreSQL ODBC driver
Download psqlODBC, the official PostgreSQL ODBC driver, from postgresql.org. Take the newest
psqlodbc_x64.msi.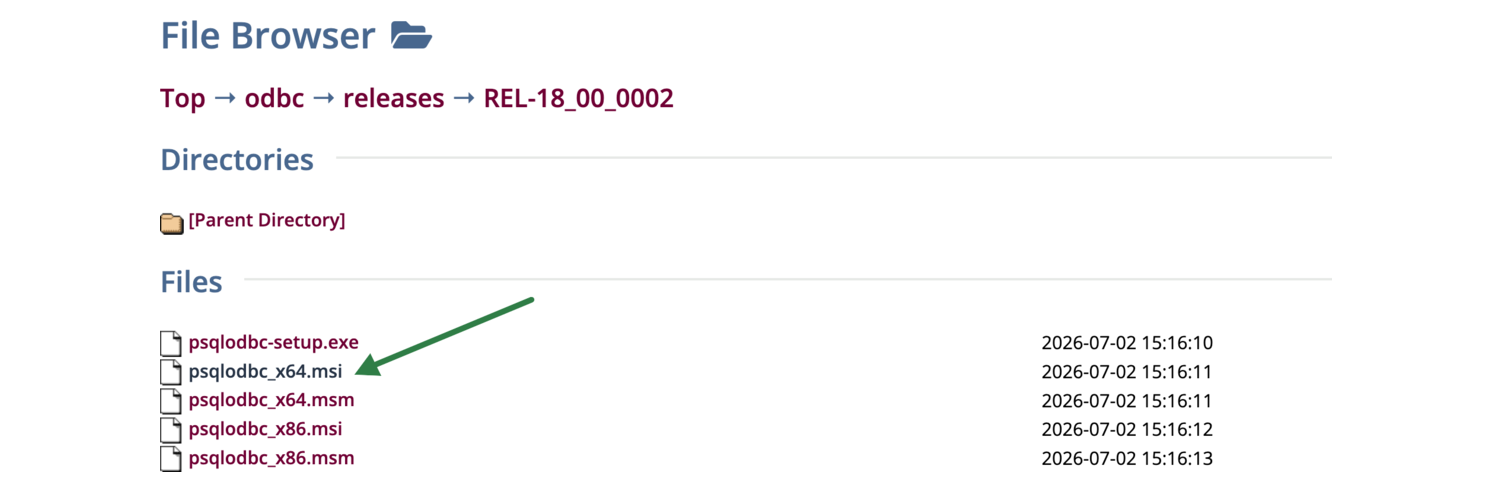
The driver download listing. Newest version, the x64file.Run the installer and accept the defaults. There is nothing to configure — Excel finds the driver by name once it is installed.
Close and reopen Excel, so it picks up the new driver.
-
Copy your connection string
In Instabooks, go to Settings → Database Access, open the company you want, and select the Excel (ODBC) tab. Click the copy button on the 64-bit Excel string.
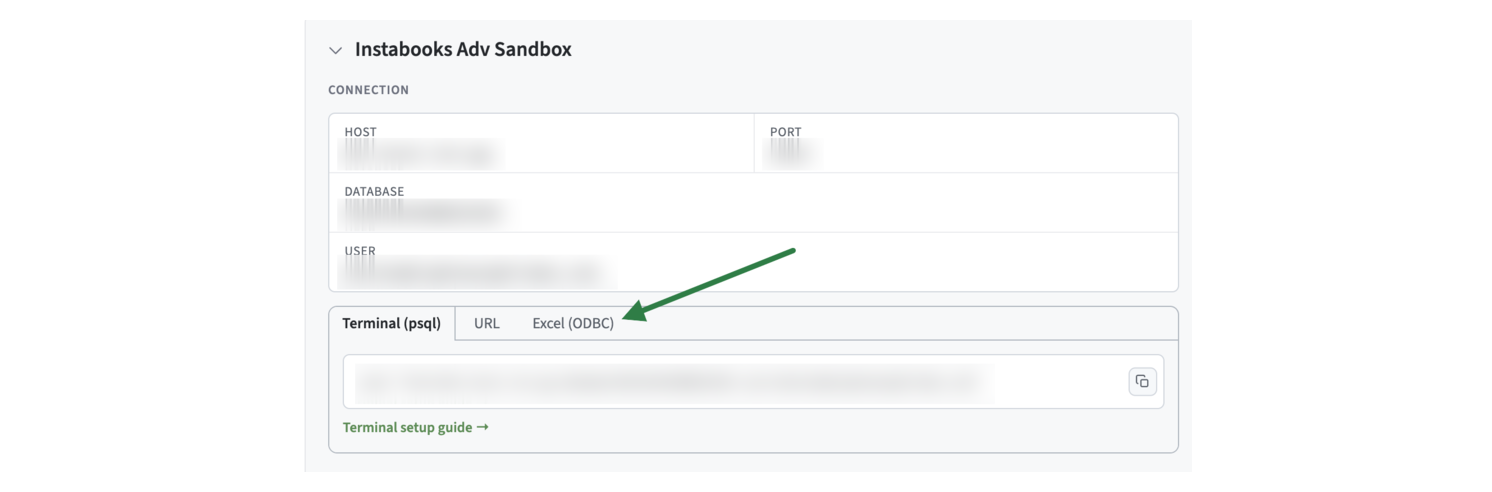
The Excel (ODBC) tab. The string already has your host and company id in it. It looks like this:
Connection stringDriver={PostgreSQL Unicode(x64)};Server=db.instabooks.io;Port=5432;Database=9341452924740861;SSLmode=require;If you are running the 32-bit build of Excel, copy the 32-bit Excel string instead — it is the same except for the driver name. (Check under File → Account → About Excel if you are not sure; almost every current install is 64-bit.)
Note there is no username in the string. Power Query keeps credentials in its own store and refuses a string that carries one — you will enter yours in step 4.
-
Start the ODBC connector in Excel
On the Data ribbon, choose Get Data → From Other Sources → From ODBC.
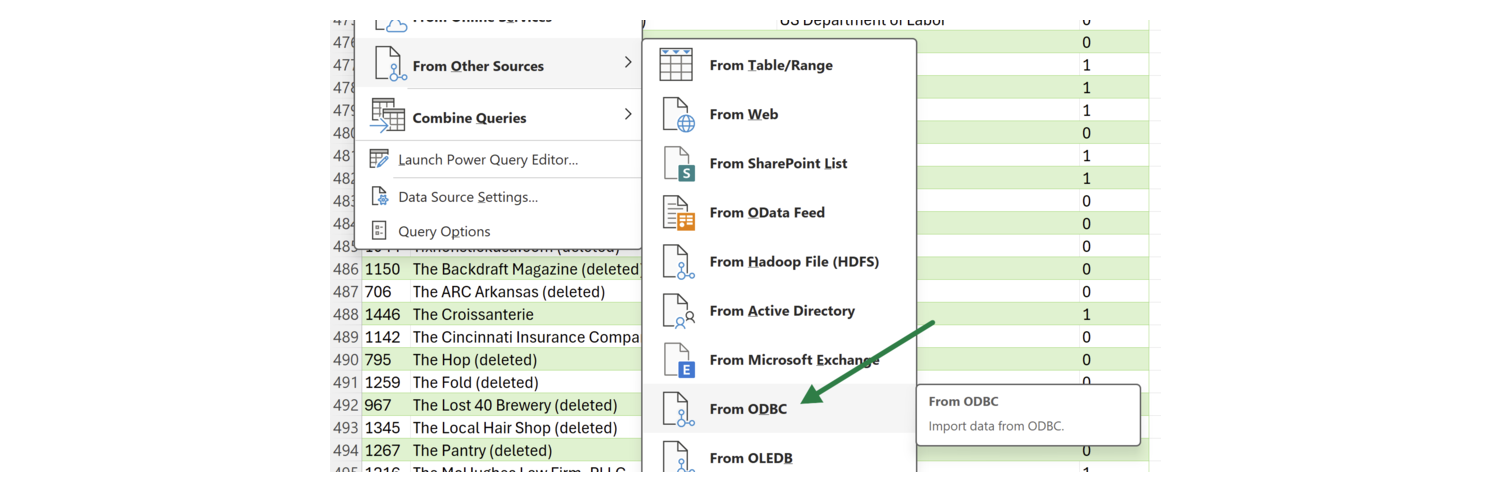
The ODBC connector lives under Other Sources. In the From ODBC dialog, leave the data source name (DSN) as (None), expand Advanced options, and paste your connection string into the Connection string box. Click OK.
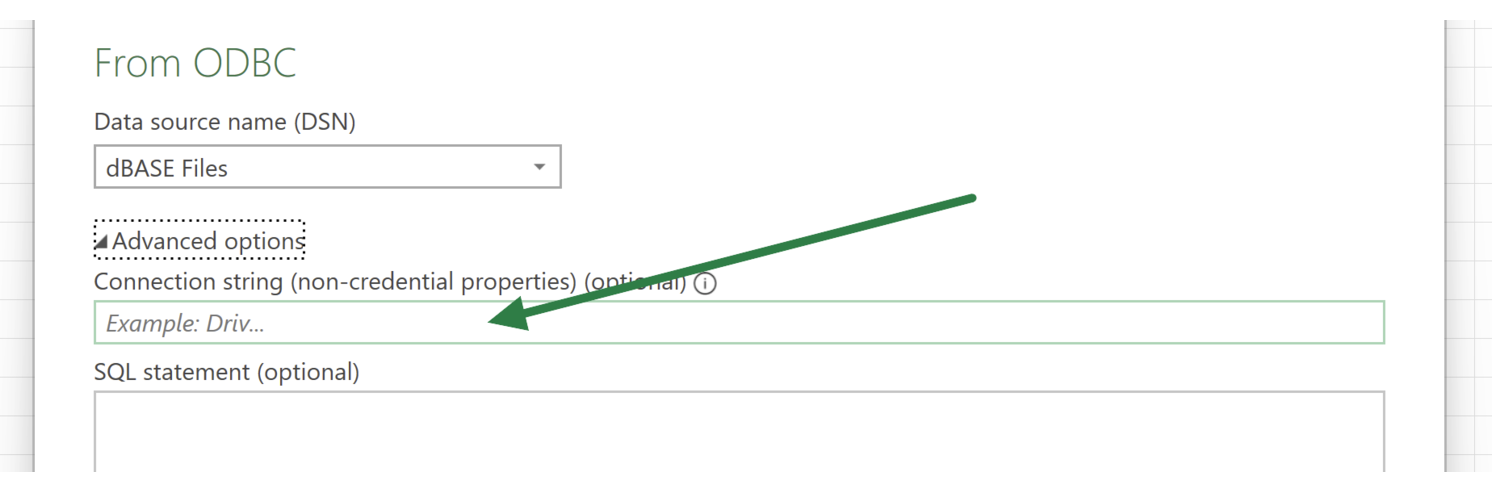
DSN stays (None); the connection string goes under Advanced options. -
Enter your credentials
Power Query asks who you are. In the panel on the left choose Database — not Default, and not Windows. Enter your Instabooks email as the User name and the password you generated as the Password, then click Connect.
Excel remembers these credentials for this connection. To change or clear them later, go to Data → Get Data → Data Source Settings, pick the connection, and choose Edit Permissions.
-
Pick your tables
The Navigator lists the tables of your books. Click one to preview its rows.

Navigator, previewing transaction_lines. Tick Select multiple items to bring in more than one.Then choose one of:
- Load — drop the table straight into a worksheet.
- Transform Data — open the Power Query Editor first, to filter, pick columns, or rename before loading. This is the better habit for the big tables.
-
Work with the data
The result arrives as an Excel table you can pivot, chart, or reference from formulas like any other.
To pull fresh numbers, click Data → Refresh All. The query re-runs against your books, using the stored credentials.
Let the server do the work
transaction_lines can run to hundreds of thousands of
rows. Loading all of it and pivoting in Excel works, but it is slow
and it makes the workbook large. It is usually better to have the
books do the grouping and hand Excel the summary.
The From ODBC dialog's Advanced options has a SQL statement box below the connection string. Put a query there and Excel loads only its result:
select date_trunc('month', l.date) as month,
       a.type as account_type,
       sum(l.amount) as amount
  from transaction_lines l
  join accounts a on l.account_oid = a.oid
 where l.date >= '2024-01-01'
 group by date_trunc('month', l.date), a.type
 order by month, account_type
Tables & SQL has the columns and the query patterns that work here.
Things to know
- It is read-only. Nothing you do in Excel writes back to your books or to QuickBooks.
- Join tables in SQL, not in Excel. Write the joins into your query and load the result — the id columns that connect the tables are in Tables & SQL.
-
Both sides of every entry are in
transaction_lines. A sum over unfiltered lines nets to about zero by design. Filter by account type — see the double-entry note in Tables & SQL.
If something goes wrong
- "We couldn't authenticate with the credentials provided." Re-enter them on the Database tab of the credentials prompt, and check the password is the one issued for this company. Clear the stored credentials in Excel under Data → Get Data → Data Source Settings → Edit Permissions and try again.
- The driver is not listed / "Data source name not found." Excel and the driver must match in bitness, and Excel has to be restarted after installing. Re-check the driver name in your connection string against what the installer put in ODBC Data Sources (64-bit).
- A query errors out. This endpoint supports a subset of SQL, unsupported syntax will return an error. See Tables & SQL.
More on all of these in Troubleshooting.